This week’s topic is about fixing or correcting your work when you have used pigments and do not like the results. My example for this newsletter is Mother Teresa – Let Us Begin, 24″ x 24″. This piece was created for a 2014 Notable Women Initiative Call for Entry by the Rogue Art Quilters of Ashland, Oregon. The image at the top is the final version of this award-winning piece.
So why am I using this as my example for this issue? The truth of the matter is that there were some serious challenges that I had to address during the creation of this piece. And, I think I handled those “fixes” well because you might never know there were issues unless I told you about them here (which is fine by me!).
Those wayward pigments are always doing what they want and not what I want them to do. What do I mean by that?!
I have two important thoughts I share with my students: “dance with the pigments” and “embrace the wicking”. Bottomline, when you color on fabric using pigments, the pigment can react in unexpected ways. Sometimes there is a logical reason why this happens, sometimes not (okay, there is always a logical reason; I just cannot figure it out all the time!).
There are so many factors involved: the fabric content and structure, the content of the pigment (color & binders and other things manufacturers add to create them) and any mediums you use in the process of applying the pigment to the fabric. Even the work environment can affect the results, like humidity and elevation.
I cover much of this in my 8-week Get Pigment Confident (GPC) Challenge. Attendees learn my techniques for testing pigments before using them on a project so you are better prepared for what might happen. Forewarned is forearmed! Truly, coloring on fabric using pigments is an adventure! And a fun one!
The details are much too complex to explain here. The reality is that you may have wicking issues that you will need to fix or mitigate in your project. So let me use this examination of the wicking issues I experienced with Mother Teresa as an example of a “win”. I was able to my resolve wicking issues enough to save my project.
Before I go further, let me define “wicking” for you. The website labelplanet.co.uk defines wicking in part as “… the tendency of a liquid to travel through the material regardless of (and sometimes in opposition to) external forces such as gravity. Also known as capillary action or capillary motion…”. Sometimes it is called “bleeding”. It is the bane of any project because it happens and can very hard to control.
You don’t have to worry about wicking as long as you only use dry pigments to color on the fabric. Any time you add some form of moisture to the pigment, you will have wicking. The key is to manage it a much as possible, and I have learned techniques that help. As long as I remember to apply them and avoid wicking action (as much as possible) in my work!

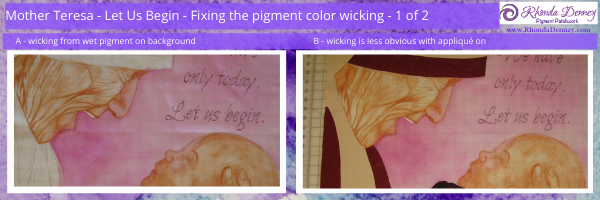
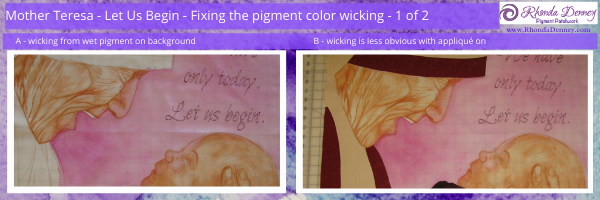
The banner above shows two images of my project in-progress. Luckily I had documented my progress using photographs so I could show you what happened.
The first image (far left) shows what happened when I got overly zealous with my water as I added color to my background using watercolor pencils. If you look closely at Mother T’s nose and the baby’s face, you can really see the wicking that resulted.
The second image (far right) illustrates how the project changes when you add other elements to the design. That can help draw the eye away from areas that may not be perfect in your eyes. Again, we need to learn to “embrace the wicking” and make the best of it!

This banner shows two more images of my project in-progress showing more steps in my fixing of the issues.
The first image (far left) shows the progress when I added stitching or quilting to the project as well as more pigments to help blend and cover the wicked pigment colors.
And finally, the second image (far right) is a close-up of Mother T’s face. Here you can see that the addition of pigments to the fabric have done a good job of addressing the wicking issues. The magic of coloring on fabric using pigments!
Obviously, I could have taken steps to minimize the wicking before it happened, but that did not happen in this case. Instead of lamenting about the resulting wicking and giving up on the project or starting over again, I took steps to alleviate the intense color that resulted. A win in my book.
This illustrates the power of layering of color. In most of my projects I do not limit myself to one type of pigment. Instead, I use different pigments to develop the color and look that I want. I “dance with the pigments” to get the affect I want, knowing that I can add more color if necessary.
I hope you enjoyed this example of fixing a project with pigment issues. There was another glaring problem with Mother Teresa that I will expose when I next cover this topic. It should really be informative to illustrate ways to “Fix It”. Stay tuned!

I am offering my next 8-week Get Pigment Confident (GPC) Challenge starting later this month. The official start date (when Week 1 content is available) will be Saturday, February 26th.
If you are interested in joining this Challenge, please go to my website for more details. You can also fill out an application and you can schedule a Zoom call with me so we can discuss your goals.
Here is some feedback on the 8-wk GPC Challenge from Robin H. Thanks for the wonderful feedback Robin!


